How I wrote a GroupMe Chatbot in 24 hours
For the past couple years, I have worked as a teaching assistant for UVa’s CS 2150 (Program and Data Representation) course. We recently started a GroupMe chat for the course staff, and I thought it would be fun to create a chatbot to help remind all the TAs to submit timesheets, keep track of when people are holding office hours, and remember when/where TA meetings are being held. Setting up a basic chatbot is a lot simpler than it sounds and is really fun–I wrote my bot from scratch using Python in just one day.
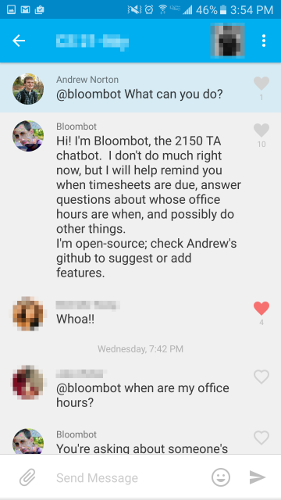
The 2150 chatbot
GroupMe Bot Overview
GroupMe has a very brief tutorial explaining how their API may be used for bots. The easiest way to create a bot is through their web form, which prompts you for the bot’s name, callback URL (technically optional, but you want it), avatar URL (optional), and the name of the group where the bot will live. Once you’ve done this, you will be given a unique bot ID token. Anyone with this token can pretend to be your bot, so keep it safe. (Security is somewhat laughable here: your bot asserts its ID and the server believes it with no “login” procedure.) We’ll talk more about the callback URL in a moment; for now, just leave it blank.
Once you’ve done these steps, you have created a bot–as far as GroupMe is concerned. If you send a specifically formatted JSON mssage, the newly created bot will post in your group. However, if left at this point, your “bot” is little more than a proxy for human-written messages submitted with curl. Your bot needs some way of reading messages sent to the group, formulating a response, and only then sending messages to the GroupMe servers.
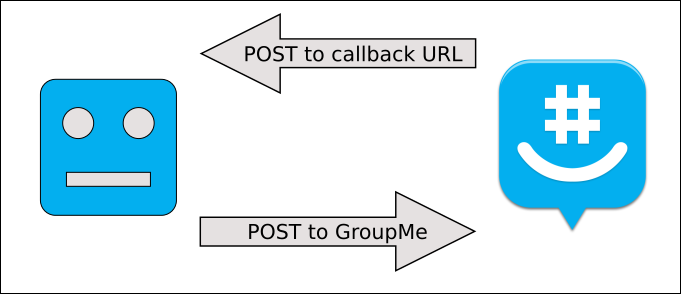
This communication is performed using HTTP POST requests carrying JSON data between your bot and the server. Every time a message is sent to your bot’s group, GroupMe POSTs the data to the callback URL you specified above. When your bot wants to respond, it POSTs its response to https://api.groupme.com/v3/bots/post.
Looks simple enough...
We’ll take a closer look at the JSON format when our bot is ready to send messages. The important thing here is that your bot needs to 1) have a public-facing URL and 2) can process POST requests. To avoid security headaches or the possibility of downtime, running your bot in the cloud is a good approach.
Heroku: A cloud solution
For my bot (and the rest of the tutorial), I used the Heroku platform for hosting. I had two primary criterion for selecting a cloud platform for my chatbot. First, it had to be free or really cheap. I’m a student and this is a “for fun” project, so I’m not going to be spending money for full server or something like that. Heroku has a free tier with 1000 hours of computation time per account per month, which is more than sufficient for the purposes of a hobby chatbot. Second, it needed an easy way to listen for visits to the callback URL. It turns out that it’s fairly simple to set up a stripped-down server in Python with Gunicorn and Flask for integration with Heroku. You can likely follow a similar process with AWS, Azure, or some other cloud service, though.
Heroku deployment operates through git pushes. I recommend installing the CLI, as it allows fast access to log information. Using this tool, you automatically create a heroku remote for your project’s git repository, then do git push heroku [branch-name] to update the running version of your app. Since I already use git for all my projects, this is a nice integration to have.
After installing the Heroku CLI, run the following commands in your terminal to create your bot app:
1$ mkdir apnorton-demo-bot # folder for your git repository
2$ cd apnorton-demo-bot
3$ git init .              # create a new git repository
4$ heroku apps:create apnorton-demo-bot # create heroku app
5$ git remote              # should show one remote target
(Of course, you should use a name different from apnorton-demo-bot.)
After running the heroku apps:create ... step, you will see two URLs printed as output; the first is the public-facing address of your server. This should be placed in the “callback URL” in the GroupMe settings for your chatbot. If you now login to Heroku, you will see your newly created app in your dashboard. Heroku also needs some configuration files to successfully launch your bot (names are exactly as below)
Procfile: commands Heroku should use to launch your appruntime.txt: specifies a particular version of Pythonrequirements.txt: anypippackages that need to be installed
These will likely be super simple for your bot; here are the options I used for each:
Procfile
This starts up the gunicorn-based Python webserver and prints all log information to standard out.
1web: gunicorn app:app --log-file=-
runtime.txt
I prefer Python 3, so that’s the runtime I specified for my bot. If the runtime is not specified, Heroku defaults to Python 2 (as of this writing).
1python-3.6.0
requirements.txt
The gunicorn package provides a lightweight server, while Flask is a framework to handle the incoming HTTP requests. You can require other packages, too, but these two are the most basic requirements:
1Flask==0.12
2gunicorn==19.6.0
Core Functionality: Python
Now that you’ve set up the Heroku server, the next step is to build a lightweight Python server to handle incoming HTTP POST requests to the Heroku URL.
A Note on the Bot ID
Since Heroku is git-based, it’s really easy to upload your bot code to GitHub to show off your project. However, you have to be careful that you don’t leak your bot ID key to the public, as anyone who has this ID can impersonate your bot and send messages on its behalf. (This is a big problem, as explicit content or phishing messages could be sent from your bot with no (easy) way of tracing the source.) Fortunately, there’s a really easy way to circumvent this using environment variables.
Instead of hardcoding the bot ID into your Python code, you can create a “config variable” in Heroku. (“Config variables” is just Heroku’s name for environment variables; they work exactly like typical environment variables in bash or the Windows command line.) Create a new environment variable through the Heroku CLI as follows:
1$ heroku config:set GROUPME_BOT_ID=[your bot id]
2$ heroku config # should display all current configuration variables
Now, whenever you need to access your secret bot ID, you can just reference the GROUPME_BOT_ID environment variable (for instance, through Python’s os.getenv('GROUPME_BOT_ID')) and the secret is not leaked when you upload your code to GitHub.
Bot Code
Create a new file called app.py. This will contain the some functions to handle any post request to the root URL. It should start with some basic boilerplate for using Flask (some standard includes and setting the app variable to be a new instance of a Flask object):
1import os
2import json
3
4from urllib.parse import urlencode
5from urllib.request import Request, urlopen
6
7from flask import Flask, request
8
9app = Flask(__name__)
After this, create a function that will be called whenever the Heroku URL receives a POST request as in the snippet below. This uses the “@app.route” decorator to specify it is for the '/' URL and responds to POST requests. For this demo, the bot will simply echo back everything said by other people in chat. The basic idea is to use the request.get_json() method to get the JSON form of the reply, create a message, and send that back to GroupMe.
 1@app.route('/', methods=['POST'])
 2def webhook():
 3  data = request.get_json()
 4
 5  # We don't want to reply to ourselves!
 6  if data['name'] != 'apnorton-test-bot':
 7    msg = '{}, you sent "{}".'.format(data['name'], data['text'])
 8    send_message(msg)
 9
10  return "ok", 200
Note that we check to make sure the name isn’t the name of our bot. This is important for any echoing bot–otherwise, it will get stuck in an infinite loop of replies to itself. (Yes, I did learn this the hard way.)
The data dictionary has the following format (blatantly stolen from the GroupMe bot tutorial):
 1{
 2  "attachments": [],
 3  "avatar_url": "http://i.groupme.com/123456789",
 4  "created_at": 1302623328,
 5  "group_id": "1234567890",
 6  "id": "1234567890",
 7  "name": "John",
 8  "sender_id": "12345",
 9  "sender_type": "user",
10  "source_guid": "GUID",
11  "system": false,
12  "text": "Hello world ☃☃",
13  "user_id": "1234567890"
14}
The attachments key would contain special features of the message, including mentions and pictures. Unfortunately, I have yet to find a way to allow users to @-ping my bot (though the bot can use the attachments key to mention other users). Your bot will likely only care about the name (or user_id) and text fields of the message, and not much else. That’s all we need for this “echo” bot.
The last remaining thing is to define the send_message function. (From a software engineering perspective, we probably would want separate parse_message and send_message functions so the core bot code could be used on any platform. However, for the echobot, the parsing is essentially nonexistent, so I rolled that into the webhook function above.) The duties of this function are to package up the message and bot ID in JSON format and submit it as a POST request. (Notice how os.getenv is used to retreive the bot ID from the Heroku environment variables instead of hard-coding the bot ID.)
1def send_message(msg):
2  url  = 'https://api.groupme.com/v3/bots/post'
3
4  data = {
5          'bot_id' : os.getenv('GROUPME_BOT_ID'),
6          'text'   : msg,
7         }
8  request = Request(url, urlencode(data).encode())
9  json = urlopen(request).read().decode()
To deploy, simply save and commit your files, then run $ git push heroku master to start your app running on Heroku. The bot should now echo whatever is said in its group. I recommend creating a “test” group developing your bot; otherwise, the other members of the bot’s group will probably get annoyed during development.
More resources: NLP and Code
This blog post focuses primarily on the “implementation” details of deploying a chatbot, and doesn’t deal with none of the natural language processing, personality creation, or content generation. There’s a lot of good content out there; I found this tutorial on creating a chatbot with Textblob (a wrapper for the popular nltk Python library) to be helpful in my own bot explorations. For my TA chatbot, I dealt only with search-string matches and used a fair bit of hardcoding, but natural language processing is the next step in my bot’s development.
As another resource, I’ve created a GitHub repository with the relevant skeleton code used in this blog at github.com/apnorton/apnorton-demo-bot. The original chatbot I wrote for the CS 2150 TAs is also on GitHub here.